
As an Amazon Associate, I earn from qualifying purchases.
Indoor Golf Simulator Enclosure Review: Professional Impact Protection for Your Home Studio.
As an Amazon Associate, I earn from qualifying purchases.
Building a home golf simulator is a dream for many golfers, but the reality of hitting real balls indoors can be intimidating. Without the right setup, a single mishit or a high-velocity shank can lead to cracked drywall, broken windows, or damaged monitors. Relying on a simple hanging net often isn’t enough to provide the immersive, high-definition experience that makes indoor practice actually productive.
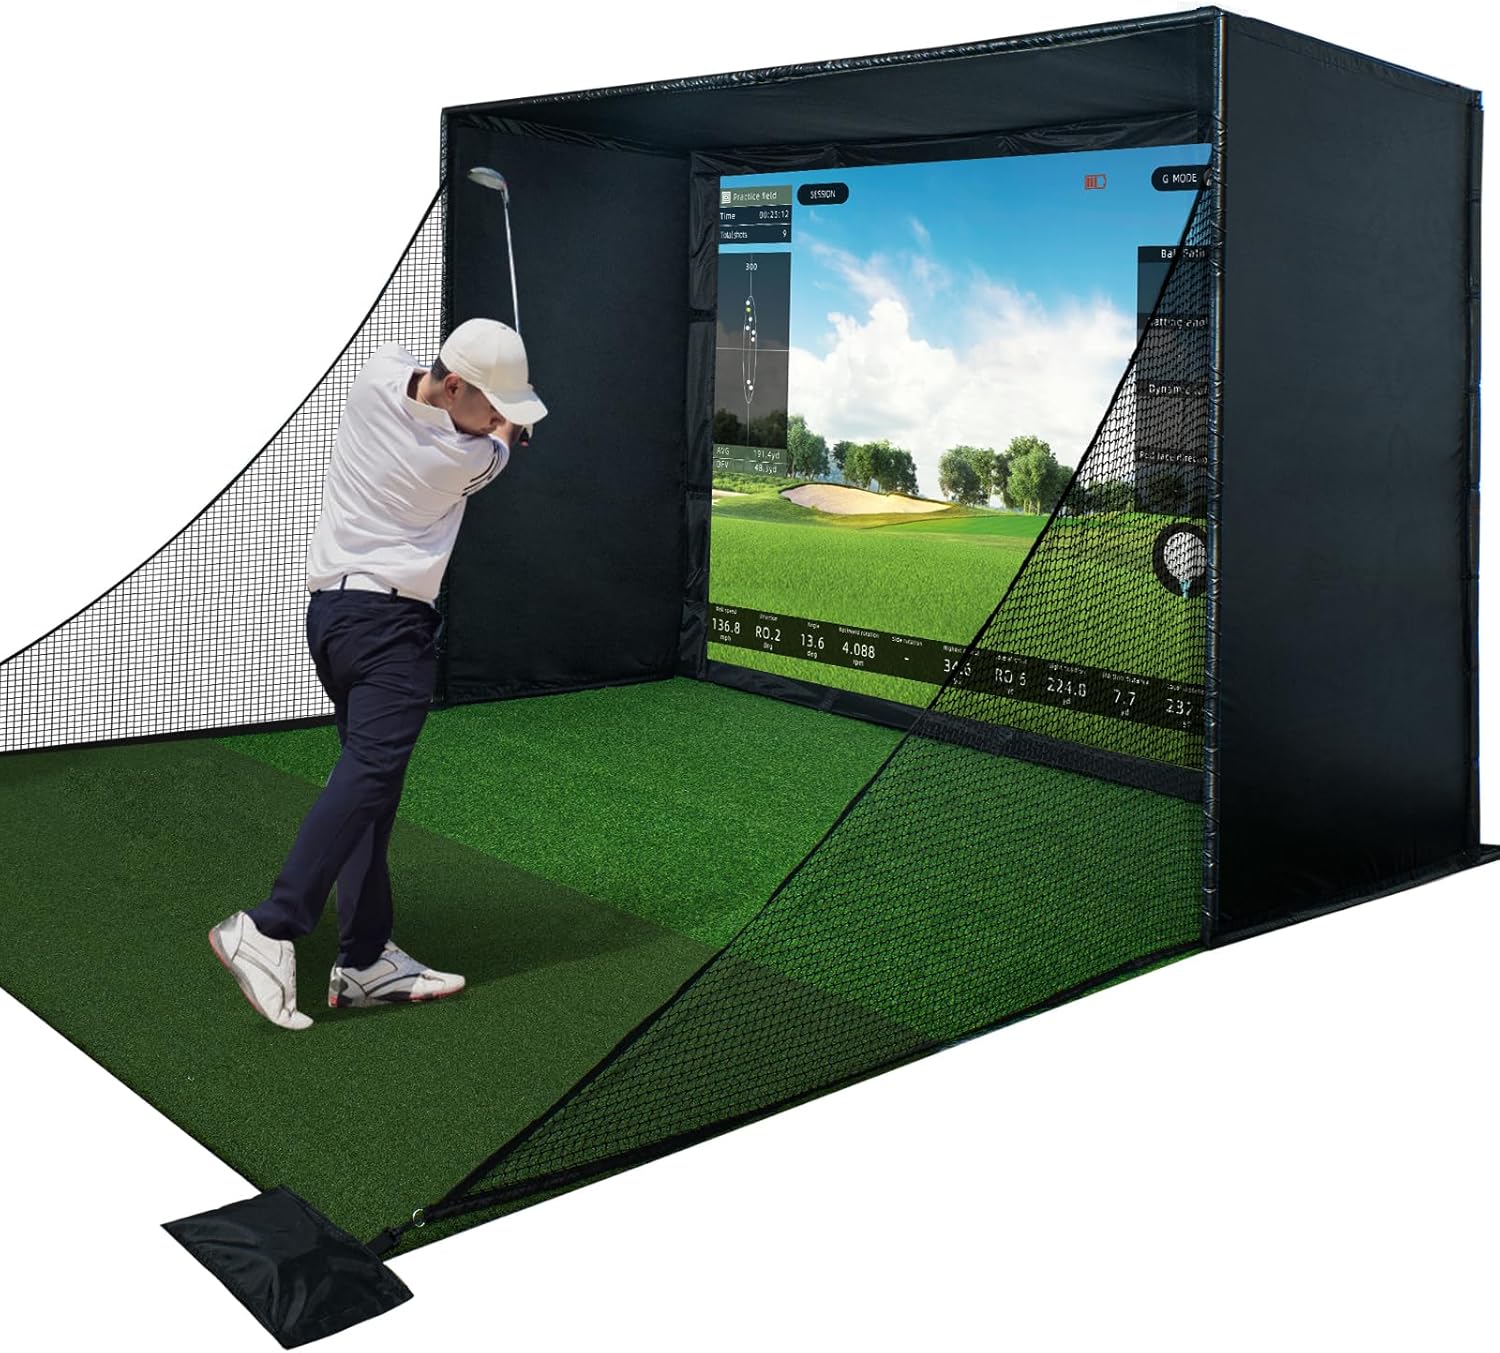
The Indoor Golf Simulator Enclosure is designed to solve these safety and immersion problems in one package. By combining a heavy-duty, blackout fabric booth with a professional-grade impact screen, it creates a dedicated “bay” for your simulator. It’s engineered to catch errant shots while providing a crisp, high-contrast surface for your projector to display your favorite courses.
Transitioning from a basic practice net to a full enclosure fundamentally changes the “feel” of indoor golf. It creates a theater-like environment that blocks out ambient light and protects your surroundings. This review breaks down the impact durability, the screen quality, and the assembly requirements to help you decide if this is the right foundation for your home golf studio.
Key Features & Specifications
A high-quality enclosure needs to balance impact absorption with image clarity. Here are the core specifications:
- Structure: Heavy-duty frame designed for stability during high-speed ball impacts.
- Impact Screen: High-performance, multi-layer screen designed to handle ball speeds over 150 MPH.
- Blackout Fabric: Triple-layered side and top panels to minimize light bleed and improve projector contrast.
- Safety Design: Wrap-around enclosure prevents shanks or sky-balls from escaping the bay.
- Compatibility: Designed to work with all major launch monitors (SkyTrak, Garmin Approach R10, FlightScope, etc.).
- Projector Optimized: Low-gain screen surface reduces “hot spotting” and provides a wide viewing angle.
- Noise Reduction: Impact-dampening materials to quiet the “thwack” of the ball hitting the screen.
Real-World Performance & Daily Utility
The true utility of a full enclosure is the peace of mind it provides. When you are standing inside a three-sided blackout booth, you can swing with 100% effort without the subconscious fear of hitting your ceiling or side walls. The side panels are thick enough to deaden even the most aggressive shanks, ensuring that the ball drops harmlessly to the floor.
Screen performance is the other half of the equation. Many DIY screens suffer from “bounce back,” where the ball snaps back toward the golfer at dangerous speeds. This enclosure utilizes a professional impact screen that is designed to absorb the kinetic energy of the ball, letting it drop vertically after impact. Furthermore, the blackout nature of the side walls significantly improves the image quality of your projector, making the virtual fairways look vibrant and deep rather than washed out by room lighting.
For daily utility, the enclosure helps define your space. It keeps your golf gear contained in one area of the basement or garage. The high-quality impact screen also doubles as a fantastic home theater screen for movie nights when you aren’t practicing your draw.
Design & Build Quality
The build quality of the impact screen is where this unit justifies its cost. It isn’t just a white sheet; it is a specialized textile designed to be hammered by golf balls thousands of times. The weave is tight enough to produce a sharp image but flexible enough to provide the necessary “give” to prevent screen tears or excessive noise.
The blackout panels are made from a heavy, light-absorbing material that doesn’t just block light—it also helps with sound dampening. In an echoey garage or basement, this enclosure acts as a sound booth, muffling the impact noise so you can practice late at night without waking up the rest of the household.
Ease of Use & Installation
Setting up a golf enclosure is a project that requires a fair amount of floor space and at least two people. Because of the size and weight of the frame and the tension required for the screen, you should expect to spend a few hours on the initial assembly.
The screen typically attaches to the frame using a system of bungees or tension straps. Dialing in the right amount of tension is key—you want it tight enough to be flat for a clear projector image, but loose enough to prevent dangerous ball bounce-back. Once it’s dialed in, the maintenance is minimal beyond occasionally vacuuming dust off the bottom of the bay.
What Makes It Stand Out?
The standout feature of this specific enclosure is the Blackout Immersion. Many home setups use a screen but leave the sides open, which lets in light and creates a “screen-only” feel. By enclosing the sides and top with heavy, dark fabric, this unit creates a “cockpit” feel that makes you feel like you’re truly standing on the tee box at Pebble Beach.
Additionally, the impact screen’s ability to handle high-speed ball impacts while remaining quiet makes it superior to budget “mesh” nets that can be noisy and allow the ball to eventually punch through.
Pros & Cons
✅ The Good
|
❌ The Bad
|
Who This Enclosure Is Best For
The Indoor Golf Simulator Enclosure is the perfect choice for dedicated golfers building a permanent home studio. If you already have a launch monitor and want to graduate from a simple net to a professional-feeling bay, this provides the safety and immersion you need.
It is also a great fit for parents who want their kids to practice indoors safely. The wrap-around protection ensures that beginner mishits stay inside the bay. However, if you have a very small room or need a setup you can take down in five minutes, a portable pop-up net would be a better, albeit less immersive, solution.
Final Thoughts
Practicing your game at home shouldn’t be a stressful experience. By creating a dedicated, safe environment, the Indoor Golf Simulator Enclosure allows you to focus entirely on your swing mechanics. It transforms a section of your home into a legitimate training facility that looks as good as it performs.
While it requires a significant amount of space and an initial investment in assembly time, the result is a professional-grade simulator bay that protects your property and elevates your virtual golf experience. If you are ready to stop “hitting into a net” and start “playing the course” with total confidence, this enclosure is the foundational piece your home studio needs.
As an Amazon Associate, I earn from qualifying purchases.